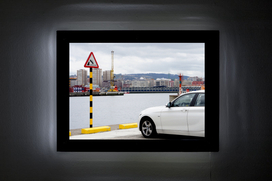
Whether you are framing a favorite photograph or an original canvas painting, the use of LED light strips can bring the art within the frame to life. This guide will share step by step instructions to construct a simple but modern art frame that is complemented by the integration of LED light strips.
Before getting started, here is a list of materials needed for this project:
1 x 3 x 8 pine furring strip - $2*
2 x 2 x 8 furring strip - $2*
Brad nails and construction adhesive - $6
LED lighting kit(s) - $46
1/8th in. glass pane - $4 (optional)
*quantity of furring strips will vary with size of frame. This material list is for the construction of one 18” x 24” frame
Total Cost: $60
2 x 2 x 8 furring strip - $2*
Brad nails and construction adhesive - $6
LED lighting kit(s) - $46
1/8th in. glass pane - $4 (optional)
*quantity of furring strips will vary with size of frame. This material list is for the construction of one 18” x 24” frame
Total Cost: $60
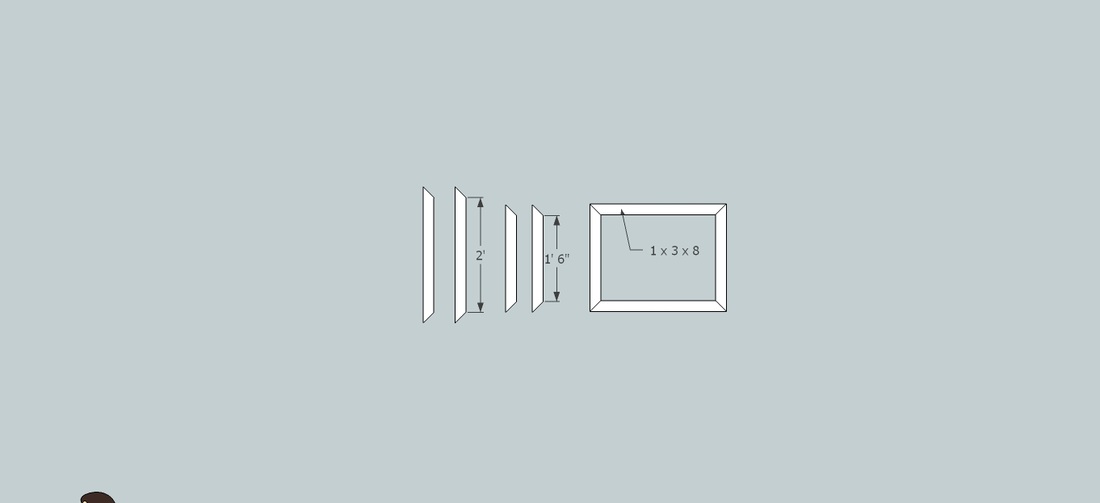
Begin building the frame by cutting down the furring strips to size. You will want to do this using a miter block and a fine blade hacksaw to make accurate cuts on a 45 degree angle. If you happen to have your own woodshop, there are a
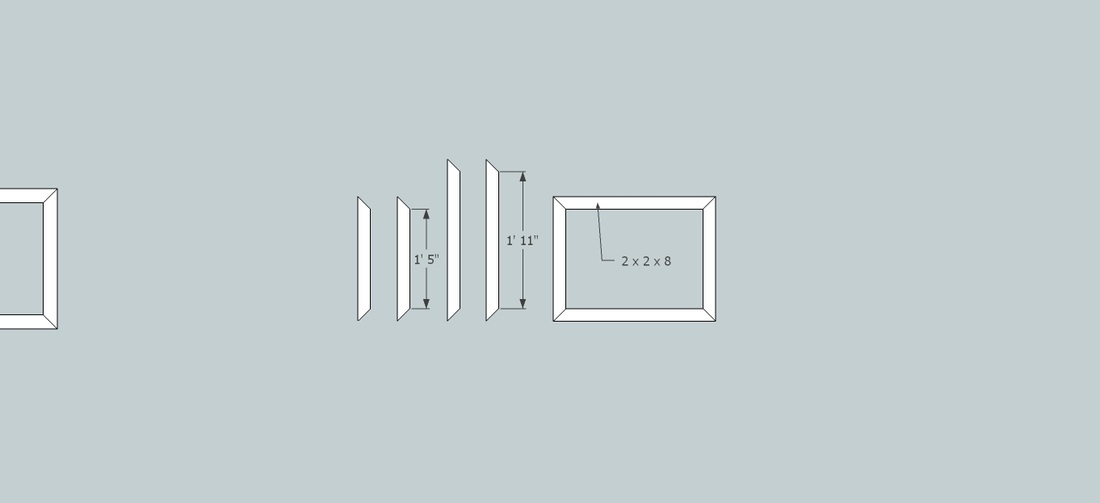
number of other ways to make these cuts. Take the 1 x 3 x 8 strip and cut (2) 18 inch strips and (2) 20 inch strips. Measurements are to be made to the shorter edge of the miter cut. Cut the 2 x 2 x 8 strip into (2) 17 inch strips and (2) 23 inch strips. The diagram below will show how to layout these pieces.
number of other ways to make these cuts. Take the 1 x 3 x 8 strip and cut (2) 18 inch strips and (2) 20 inch strips. Measurements are to be made to the shorter edge of the miter cut. Cut the 2 x 2 x 8 strip into (2) 17 inch strips and (2) 23 inch strips. The diagram below will show how to layout these pieces.
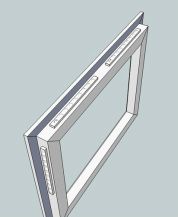
Glue each frame together with a few dabs of construction adhesive in the 45 degree joints.
You will notice that the one frame is slightly smaller than the other. Place the larger frame with thinner strips directly on top of the smaller frame. The inner frame should offset 1 inch below. This is where the photo or canvas frame will sit.
Join the two frames together with a few brad nails and soild bead of construction adhesive.
Now is the best time to install the LED strip lighting kit. The LED light strips will sit on the outside edge of the 2 x 2 frame, right behind the thinner front frame. The 1 inch reveal of the outer frame leaves plenty of room to hide mounting hardware and link cables.
Use the provided hardware in your LED lighting kit to mount the strips and connect the links to the power supply. Ideally you would have an outlet directly behind the art frame. If this is not the case run the cord straight to the nearest outlet. You can also consider drilling a small hole in the drywall behind your frame and fishing the power supply cord from the nearest outlet to the frame.
Adding the art to the frame will vary depending on what you are framing. If it is an 18 x 24 art canvas, set the art into the frame and attach with double sided tape. Reinforce the bond by screwing or nailing from the back furring strip into the wood that the canvas is
wrapped around.
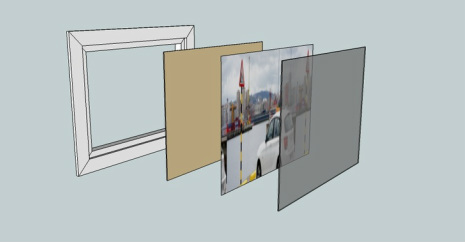
If mounting an 18 x 24 photograph; lay 18 x 24 piece of cardboard into the frame, followed by the photograph, and an piece of glass cut to size. The piece of glass, cut to size, can be obtained from a hardware store for a small cost. Secure the glass with a carefully placed bead of silicone, or, for a more professional look, use a think quarter round tack strip painted to match your frame. This can be obtained from a craft or frame store.
Adding the art to the frame will vary depending on what you are framing. If it is an 18 x 24 art canvas, set the art into the frame and attach with double sided tape. Reinforce the bond by screwing or nailing from the back furring strip into the wood that the canvas is
wrapped around.
If mounting an 18 x 24 photograph; lay 18 x 24 piece of cardboard into the frame, followed by the photograph, and an piece of glass cut to size. The piece of glass, cut to size, can be obtained from a hardware store for a small cost. Secure the glass with a carefully placed bead of silicone, or, for a more professional look, use a think quarter round tack strip painted to match your frame. This can be obtained from a craft or frame store.
 RSS Feed